
Have you ever wanted to bring your pull request changes in a cloud image easily?
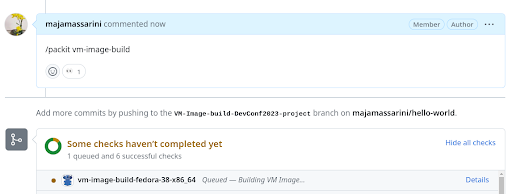
Curious about how easy it can be? With Packit, it can be just about commenting on your pull request with /packit vm-image-build.
With the above command, Packit automates all the manual steps needed to create an RPM package with your pull request changes and asks the Image Builder to install it inside a brand new cloud image. Let's have a look at the prerequisites for this.
Join the Red Hat Developer Program
If you don't already have a business account you can create a Red Hat Developer account at no cost here.
You need a subscription in order to use the Image Builder service and launch the builded images in the AWS management console.
Prepare to upload AWS AMI images
Before uploading an AWS AMI image, you must configure the AWS system for receiving them.
Prerequisites
- You must have an Access Key ID configured in the AWS IAM account manager.
- You must have a writable S3 bucket prepared.
Procedure
Follow these steps to satisfy the above prerequisites.
The manual steps
Are you wondering what are the manual steps for bringing your pull request changes in a cloud image and why you should automate them?
There could be many ways to achieve this goal but let's see together the closest to our automated solution. Below you can find a summary of all the needed manual steps; I am quite sure after reading them, you will want to automate them with Packit!
Build an RPM package with your pull request changes through COPR, go to https://copr.fedorainfracloud.org
- Install
copr-cli. - Create your account and service token.
- Add your token to `~/.config/copr.
- Create a new COPR project.
- Start a build with your local pull request changes using
copr-cli. - WAIT for the build to finish.
- Install
Create a new cloud image through the Image Builder console, go to https://console.redhat.com/insights/image-builder 7. Login with your Red Hat developer account. 8. Click on the
Create Imagebutton, choose AWS image type and follow the wizard. 9. WAIT for the build to finish. 10. Open theLaunchlink for the builded image.Launch and access the AWS image through the AWS management console, go to https://aws.amazon.com/console/ 11. The previous link will open an AWS console tab with the Launch an Instance wizard preset to use the builded image. You need to login into the AWS management console using an AWS Account ID allowed to access the AMI Image you just created. 12. Select a Key pair, or create one if you don't have it already, to be able to ssh the image later. 13. Click on
Launch Instance14. Connect to instance using an ssh client 15. Add the previously created COPR repo to the list of available dnf repositories. 16. Install the package you have created at step number 4. 17. Now you are ready to test your code in a real cloud image.
For every new pull request you want to test directly in a cloud image you have to repeat steps 4-16 or automate them through Packit!
Automate the steps
Install Packit
Installing Packit is pretty straightforward.
- Create a valid Fedora Account System (FAS) account (if you don't already have one). Why do you need it? After these few steps you will start building (and potentially shipping) Fedora packages through the COPR service and we need you to agree with the Fedora license.
- Install our GitHub application on GitHub Marketplace, or configure a webhook on GitLab (depending on where your project lives).
- Make Packit approve your FAS username; on Github the approval process is automated and for Gitlab you have to contact us.
Now you are ready to automate the process as described below.
Setup Packit
Create a .packit.yaml configuration file in your pull request.
But just the first time! After your pull request has been merged, Packit will take the .packit.yaml file from the target main branch.
The configuration file will look like the following:
---

jobs:
- job: copr_build
  trigger: pull_request
  targets:
  - fedora-all

- job: vm_image_build
  trigger: pull_request
  image_request:
    architecture: x86_64
    image_type: aws
    upload_request:
      type: aws
      options:
        share_with_accounts:
        - < shared-aws-account-id >
  image_distribution: fedora-39
  copr_chroot: fedora-39-x86_64
  image_customizations:
    packages: [hello-world]
copr_build job
The first job tells Packit service to build an RPM package, for the Fedora release you want, in this example all the active fedora releases, and to add your pull request changes to the package.
To further customize the COPR builds made by Packit you may want to give a look at this guide.
vm_image_build job
The second job tells Packit how to configure the Builder Image service.
The first two lines of this job are still meant for Packit;
they allow Packit to react to your pull request comment /packit vm-image-build.
Packit does not build a VM image automatically, as it does when it builds a COPR package,
to save you from no wanted costs.
- job: vm_image_build
trigger: pull_request
The other lines are meant to customize the Image Builder behaviour.
You are asking to build an AWS image, with a fedora-39 distribution, for the x86_64 architecture and you want to share it with the listed AWS Account IDs.
image_request:
  architecture: x86_64
  image_type: aws
  upload_request:
    type: aws
    options:
      share_with_accounts:
      - < shared-aws-account-id >
image_distribution: fedora-39
You don't want to manually install the COPR package into the image, for this reason you ask the Image Builder to install it (hello-world).
You tell Image Builder to take it from the COPR chroot fedora-39-x86_64, and you don't need to create or specify a COPR project because it has been automatically created by Packit for you.
copr_chroot: fedora-39-x86_64
image_customizations:
  packages: [hello-world]
Create, comment and test a pull request!
Create a pull request, mine will show you the world word in green 🌿.
You are ready to go, just comment your pull request with
/packit vm-image-build
and the image will be built and customized for you.
Look for the check named vm-image-build-fedora-39-x86_64 and wait for it to finish.
Open its details and you will find the link to the AWS image.
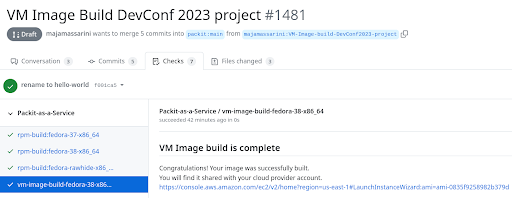
Open the AWS link (you need to be already logged in) and see the details of your image ready to be launched.
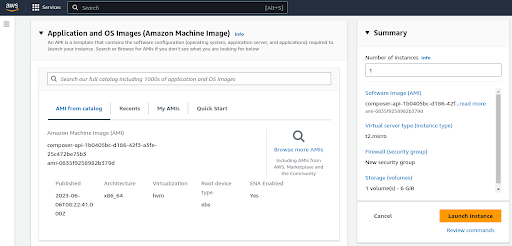
Launch your image instance and connect to it.
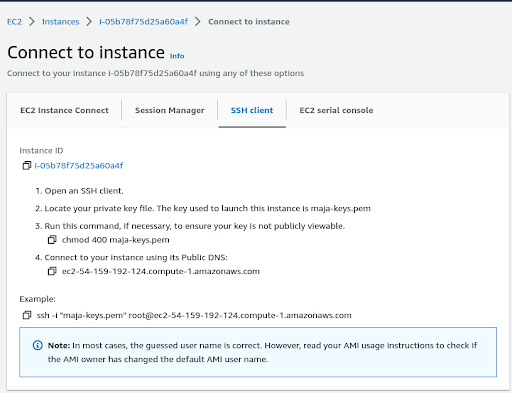
Test it!
